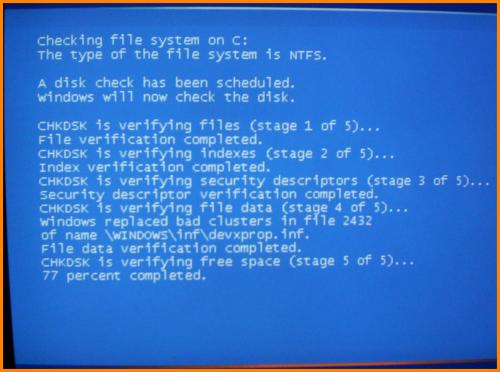
Disk error checking also known as Chkdsk performs a scan on your hard disk, usually after an improper shutdown. It verifies the logical integrity of your hard drive. If it finds any logical inconsistencies in file system data, disk error checking performs actions that repair the file system data.The tool then tries to repair any that it finds. Chkdsk can repair problems related to bad sectors, lost clusters, cross-linked files, and directory errors.
How to run disk error checking in Windows XP.1. Double-click My Computer, and then right-click the hard disk that you want to check.2. Click Properties, and then click Tools.3. Under Error-checking, click Check Now. A dialog boxthat shows the Check disk options is displayed,4. Use one of the following procedures: * To run Chkdsk in read-only mode, click Start. * To repair errors without scanning the volume for bad sectors, select the automatically fix file system errors check box, and then click Start. * To repair errors, locate bad sectors, and recover readable information, select the Scan for and attempt recovery of bad sectors check box, and then click Start. Note: If one or more of the files on the hard disk are open, you will receive the following message:The disk check could not be performed because the disk check utility needs exclusive access to some Windows files on the disk. These files can be accessed by restarting Windows. Do you want to schedule the disk check to occur the next time you restart the computer? Click yes to schedule the disk check, and then restart your computer to start the disk check.After disk error checking completes a scan a report will be generated with the following codes:0 ...No errors were found.1... Errors were found and fixed.2... Disk cleanup, such as garbage collection, was performed, or cleanup was not performed because /f was not specified.3... Could not check the disk, errors could not be fixed, or errors were not fixed because /f was not specified. You can also run disk error checking from the command prompt 1. Click Start, and then Run. 2. In the run box, type cmd, and then press ENTER. 3. Use one of the following procedures: * To run disk error checking in read-only mode, at the command prompt, type chkdsk, and then press ENTER. * To repair errors without scanning the volume for bad sectors, at the command prompt, type chkdsk volume:/f, and then press ENTER. Note: If one or more of the files on the hard disk are open, you will receive the following message: Chkdsk cannot run because the volume is in use by another process. Would you like to schedule this volume to be checked the next time the system restarts? (Y/N) Type Y, and then press ENTER to schedule the disk check, and then restart your computer to start the disk check. * To repair errors, locate bad sectors, and recover readable information, at the command prompt, type chkdsk volume:/r, and then press ENTER.
To run disk error checking in Windows Vista1. Click on the Start Menu.2. Click the Computer button.3. Right click on your hard drive (normally the C drive)and click on Properties.4. Click the Tools tab.5. Click on Check Now under the Error checking section. 6. Click on Continue in the UAC prompt.7. Make sure both options are checked. Click Image to EnlargeClick Image to EnlargeThe "Automatically Fix File System Errors" box will already be checked by default.8. Click on the Start button.9. You will get a pop-up window saying, "Windows can't check this disk while it's use". 10. Click on the Schedule disk check button for chkdsk to run the next time you restart your computer.
Disk Error Checking by PC Apprentice 2009 - 2017 “Never trust a computer you can’t throw out a window.”- Steve Wozniak


 How to run disk error checking in Windows XP.
1. Double-click My Computer, and then right-click the
hard disk that you want to check.
2. Click Properties, and then click Tools.
3. Under Error-checking, click Check Now. A dialog box
that shows the Check disk options is displayed,
4. Use one of the following procedures:
* To run Chkdsk in read-only mode, click Start.
* To repair errors without scanning the volume for bad
sectors, select the automatically fix file system errors
check box, and then click Start.
* To repair errors, locate bad sectors, and recover readable information, select the Scan for and attempt recovery of bad
sectors check box, and then click Start.
Note: If one or more of the files on the hard disk are open, you will receive the following message:
The disk check could not be performed because the disk check utility needs exclusive access to some Windows
files on the disk. These files can be accessed by restarting Windows. Do you want to schedule the disk check to
occur the next time you restart the computer?
Click yes to schedule the disk check, and then restart your computer to start the disk check.
After disk error checking completes a scan a report will be generated with the following codes:
0 ...No errors were found.
1... Errors were found and fixed.
2... Disk cleanup, such as garbage collection, was performed, or cleanup was not performed
because /f was not specified.
3... Could not check the disk, errors could not be fixed, or errors were not fixed because /f was
not specified.
You can also run disk error checking from the command prompt
1. Click Start, and then Run.
2. In the run box, type cmd, and then press ENTER.
3. Use one of the following procedures:
* To run disk error checking in read-only mode, at the command prompt, type
chkdsk, and then press ENTER.
* To repair errors without scanning the volume for bad sectors, at the
command prompt, type chkdsk volume:/f, and then press ENTER.
Note: If one or more of the files on the hard disk are open, you will receive
the following message:
Chkdsk cannot run because the volume is in use by another process. Would
you like to schedule this volume to be checked the next time the system
restarts? (Y/N)
Type Y, and then press ENTER to schedule the disk check, and then restart
your computer to start the disk check.
* To repair errors, locate bad sectors, and recover readable information, at
the command prompt, type chkdsk volume:/r, and then press ENTER.
To run disk error checking in Windows Vista
1. Click on the Start Menu.
2. Click the Computer button.
3. Right click on your hard drive (normally the C drive)
and click on Properties.
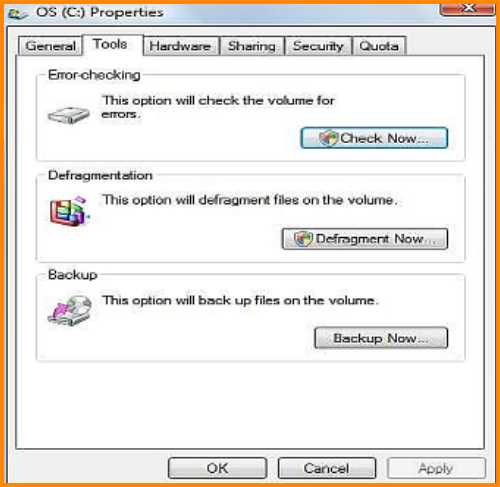
4. Click the Tools tab.
5. Click on Check Now under the Error checking section.
6. Click on Continue in the UAC prompt.
7. Make sure both options are checked.
How to run disk error checking in Windows XP.
1. Double-click My Computer, and then right-click the
hard disk that you want to check.
2. Click Properties, and then click Tools.
3. Under Error-checking, click Check Now. A dialog box
that shows the Check disk options is displayed,
4. Use one of the following procedures:
* To run Chkdsk in read-only mode, click Start.
* To repair errors without scanning the volume for bad
sectors, select the automatically fix file system errors
check box, and then click Start.
* To repair errors, locate bad sectors, and recover readable information, select the Scan for and attempt recovery of bad
sectors check box, and then click Start.
Note: If one or more of the files on the hard disk are open, you will receive the following message:
The disk check could not be performed because the disk check utility needs exclusive access to some Windows
files on the disk. These files can be accessed by restarting Windows. Do you want to schedule the disk check to
occur the next time you restart the computer?
Click yes to schedule the disk check, and then restart your computer to start the disk check.
After disk error checking completes a scan a report will be generated with the following codes:
0 ...No errors were found.
1... Errors were found and fixed.
2... Disk cleanup, such as garbage collection, was performed, or cleanup was not performed
because /f was not specified.
3... Could not check the disk, errors could not be fixed, or errors were not fixed because /f was
not specified.
You can also run disk error checking from the command prompt
1. Click Start, and then Run.
2. In the run box, type cmd, and then press ENTER.
3. Use one of the following procedures:
* To run disk error checking in read-only mode, at the command prompt, type
chkdsk, and then press ENTER.
* To repair errors without scanning the volume for bad sectors, at the
command prompt, type chkdsk volume:/f, and then press ENTER.
Note: If one or more of the files on the hard disk are open, you will receive
the following message:
Chkdsk cannot run because the volume is in use by another process. Would
you like to schedule this volume to be checked the next time the system
restarts? (Y/N)
Type Y, and then press ENTER to schedule the disk check, and then restart
your computer to start the disk check.
* To repair errors, locate bad sectors, and recover readable information, at
the command prompt, type chkdsk volume:/r, and then press ENTER.
To run disk error checking in Windows Vista
1. Click on the Start Menu.
2. Click the Computer button.
3. Right click on your hard drive (normally the C drive)
and click on Properties.
4. Click the Tools tab.
5. Click on Check Now under the Error checking section.
6. Click on Continue in the UAC prompt.
7. Make sure both options are checked.
 Click Image to Enlarge
Click Image to Enlarge
Click Image to Enlarge
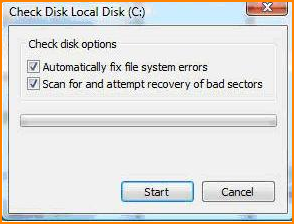 The "Automatically Fix File System Errors" box will
already be checked by default.
8. Click on the Start button.
9. You will get a pop-up window saying, "Windows
can't check this disk while it's use".
10. Click on the Schedule disk check button for
chkdsk to run the next time you restart your
computer.
The "Automatically Fix File System Errors" box will
already be checked by default.
8. Click on the Start button.
9. You will get a pop-up window saying, "Windows
can't check this disk while it's use".
10. Click on the Schedule disk check button for
chkdsk to run the next time you restart your
computer.
 Disk Error Checking by PC Apprentice 2009 - 2017
 “Never trust a computer you can’t throw
out a window.”
- Steve Wozniak
“Never trust a computer you can’t throw
out a window.”
- Steve Wozniak